
No, you don’t need to set your car ablaze to remove the Rain-X from the glass!
Editor note (Dec 2021): We first wrote this back in 2018 and I just came across this video from Carhax… while he’s not removing Rain-x from the windshield, it’s a funny video showing what happens when windshields and fire meet!
If you are a true blue car enthusiast, you probably used Rain-X to treat the windshield in your ride. There is absolutely nothing wrong in using Rain-X. In fact, I apply Rain-X to all the glass surfaces in my car, including the side windows, rear windshield, and the side mirrors.
Rain-X is formulated to repel rain, sleet, and snow while driving. They use the term, HydroPhobic. Hydro = Water // Phobic = Anti
The product is so effective that you can see raindrops bouncing or sliding off the windshield when it rains, even when the wiper blades are turned off!
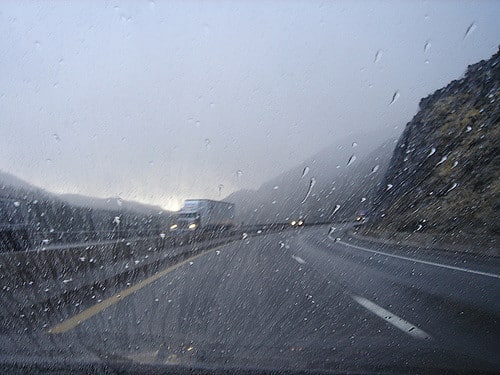
However, driving in the rain without using windshield wipers is downright irresponsible and (probably) illegal. The Rain-X Glass Treatment will basically make life easier for your wipers as the water will easily slide off the glass surface to improve your vision.
How Long Does Rain X Last?
Depending on prevailing weather conditions, the Rain-X treatment in your windshield will last for up to 3 months. In my experience, the treatment wears off in a month in rainy weather, but it does tend to last longer in the summer (when there’s less rain… imagine that!).
But as the treatment begins to wear off, the windshield will become smeary at the slightest provocation of moisture. Engaging the wipers will tend to make things worse. This is the sign that the windshield needs a new coat of Rain-X, but, and here comes the sucky part….
You have to remove the old residue before applying a new treatment coat!
Rain-X is formulated using silicone-based materials. The bad news is that silicone is not designed to be removed easily using soap and water. But the good news is that you can buy commercially available automotive glass cleaners that can effectively remove traces of Rain-X in the windshield of your ride.
The Easy Steps in Removing Rain-X Off the Windshield
Just a quick notice that is applicable to this and all other cleaning tips: ALWAYS test in a small, inconspicuous (not easily noticeable) spot just in case it doesn’t work.
In order to easily remove all the traces and residue of Rain-X off the windshield of your car, you will need the following items:
- Dish soap (I prefer Dawn)
- Small bucket of water
- Microfiber towels
- Windshield glass cleaner
- Rain-X Glass Treatment
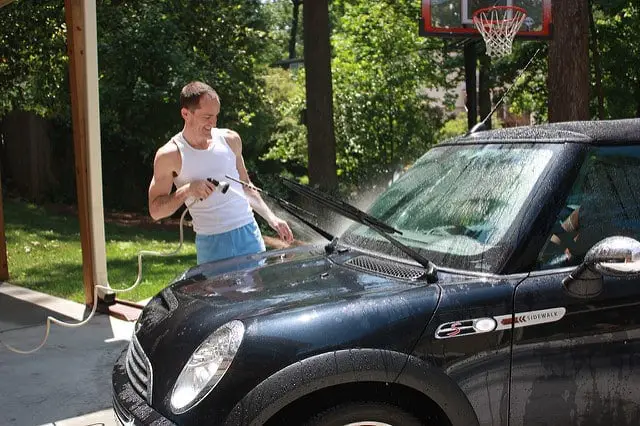
Step 1: Prepare to clean the windshield.
Park the car in a safe and shaded area. Raise the wipers so they are not touching the glass. You will need to raise the wipers because we will be using a solution of dish soap and water to clean the windshield.
Dish soap is harmful to painted and rubber surfaces. The intense cleaning action of dish soap is enough to strip off the wax in your paint. Dish soap will also dry out rubber surfaces and make them stiff and brittle. The wiper blades are made of rubber, so it is best to avoid cleaning the wiper blades using dish soap.
Step 2: Wet the windshield with water.
Use a garden hose to spray clean water on the windshield. Do not wipe a dirty windshield with a dry cloth. You will aggravate the situation by adding more scratches in the glass.
Grab a clean microfiber cloth and wipe the windshield while it’s wet. This will help to remove loose and excess dust and dirt on the windshield.
Step 3: Wash the glass with dish soap.
You can also use car shampoo for this procedure, but dish soap is better due to the harsher cleaning action. Simply mix a small amount of dish soap (just a teaspoon) in 1/2 to 3/4 gallons of water. Apply the foamy solution in the windshield using a microfiber or terry cloth towel. This will help to loosen up the silicone molecules of the Rain-X so they are easier to remove.
Focus your cleaning on the blemished and streaky parts of the windshield. Don’t hesitate to add a bit of elbow grease as you wipe the windshield using the foamy cleaner. The idea is to clean the entire windshield to help remove the Rain-X.
You can rinse the area and check for leftover streaks in the windshield. You might need to repeat the washing procedure for two or three times before the final rinse.
Pro Tip: You can use vinegar and water for some extra kick!
If the dishsoap just isn’t cutting through the RainX grime for you, try some Vinegar. The acidity of the vinegar will melt tough dirt and road film on the windshield. Simply pour 2 tablespoons of white vinegar in a spray bottle filled with a liter of clean water. Spray a liberal amount of the mixture on the windshield and rub the glass lightly using a dry towel. Wipe dry and repeat.
Step 4: Rinse the windshield.
Grab a hose or a bucket of clean water and proceed to rinse the windshield. Remove all traces of soap and suds on the glass. At this point, the windshield will be clean enough for a new coat of Rain-X glass treatment, but the job’s not done yet. There are still microscopic residue of silicone on the windshield that can only be removed using an abrasive automotive glass cleaner.
Step 5: Treat the windshield with glass cleaner.
For this step, I prefer to use the Duragloss Automotive Glass Water Spot Remover or the Griot’s Garage Fine Glass Polish. If you have never used glass polish before, you will be surprised to know that the product can also be used on all glass surfaces inside your home. You can safely clean and restore the look on shower doors, windows, and patio doors with a single treatment of glass polish.
No products found.
Quality glass polish will contain a fine combination of cleaners and micro-abrasives to clean the glass on a molecular level. The job is to simply remove a very fine layer on top of the glass to restore surface clarity. This is pretty similar to applying polish to the paint of your car. The polish is formulated to literally strip-off a light layer of the clear coat to restore the depth and clarity of the surface.
The procedure is nothing more than applying a small amount of the glass polish to a clean applicator pad and rubbing the polish in the glass. You can do this by hand or using a buffer. If you prefer to do this by hand, you should rub the product lightly on the entire surface of the windshield. Focus your efforts on the streaky parts of the glass.
Allow the polish to dry and wipe off the excess using a dry towel. You can buff the surface lightly using a dual action random orbital buffer equipped with glass polishing pads. You can repeat the procedure if the glass is extremely dirty. Apply more glass polish to remove deep scratches and stains.
Take a clean microfiber towel and give the windshield a final wipe. It should now be crystal clear and readily primed for a new coat of Rain-X glass treatment.
Step 6: Clean the wiper blades.
Before applying a fresh coat of Rain-X on the windshield, it is best to clean and check the condition of the wiper blades. This will help prevent new scratches on the freshly-polished glass when you engage the wiper blades.
Only use plain water and a wet cloth to clean the wiper blades. Do not use dish soap to clean exterior rubber surfaces. If the wiper blades are loose, cracked, or worn, replace them immediately. Make it a habit to clean the wiper blades each time you wash your car.
You should also make it a habit to check the water level in the wiper washer reservoir. Do not engage the wipers on a dry and dirty windshield. Engage the lever to spray some water on the windshield before activating the wipers. This alone will keep your windshield clear and scratch-free.
Step 6b: Replace the wiper blades.
You do not have to replace the wiper blades to completely remove Rain-X but I’ve found it’s helpful.
Wipers are a rubber material and the Rain-X solution loves to bond to the surface. So even after your windshield is squeaky clean, if it’s still on the wipers, as soon as you turn them on they’ll smear Rain X over the windshield and you’re back were you started.
Also, you should probably replace your wipers every year or two anyway, so this is a good excuse to give your wife 🙂
Step 7: Apply Rain-X on the windshield.
After cleaning the wiper blades, you can now apply a fresh treatment of Rain-X. If you don’t need to apply Rain-X, you can simply skip this step.
I prefer to re-treat the windshield with Rain-X after polishing the windshield. It will simply improve all-weather visibility while easily removing mud, bugs, salt, frost, and ice on the windshield.
The trick is to simply apply Rain-X to a small microfiber towel and work it evenly on the windshield. Use a firm and overlapping circular motion to ensure even coverage.
Allow the product to dry to a haze. Apply a bit more Rain-X to the towel and repeat the procedure above. Wait for 5 to 10 minutes until the product dries to a haze before removing the residue with a clean microfiber towel.
Finish off by wiping the windshield using a damp towel. If you prefer to apply Rain-X on the windows, side mirrors, and rear glass like I do, simply repeat the above steps until the job is complete.
5 Intense ways to remove STUBBORN Rain-X from glass
Alright if you’ve tried all the steps to this point and the Rain-X is STILL not coming off, here’s some more ideas and tips for removing Rain-X that just will not come off the windshield.
Before proceeding with any of these steps you have to know that it could ruin your windshield or paint or both. Just keep this risk in the back of your mind!
Again, test in a small, inconspicuous (not easily noticeable) spot just in case it doesn’t work.
1. Rain‑X X-treme Clean
No products found.
This is Rain-X’s own product for cleaning glass. At the time of writing this review, it costs less than $10 bucks so it might be worth trying out. Now I don’t like the fact that you may have to buy their cleaning product just to remove their treatment product, but that’s the way of the road sometimes…
One tip to this stuff is to get lots of microfiber towels and really buff the windshield. You can’t just wipe on – wipe off. You have to spend like 30 minutes buffing it out. Buff the product out of the windshield, grab a new towel, and do it again.
2. Clay bar
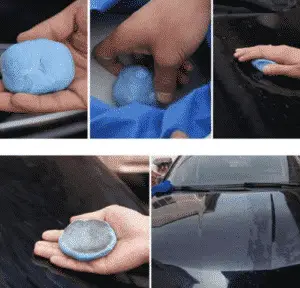
We’ve talked about clay bars here (How And When To Use A Detailing Clay Bar On Automotive Paint), but usually you use these things on your paint, not the windshield.
If the Rain-X is stubbornly stuck on your windshield, I would suggest busting out a clean clay bar and detailing your windshield with it. Make sure you keep the clay lubed up good with some Optimum No Rinse in a spray bottle or other sort of clay bar lube.
If you’re unfamiliar with claying your windshield to clean it, here’s a good video from Automotive Solano showing how to do this.
3. Razor scraper knife
I don’t know the official term for these razors, but you can use razor to clean Rain-X from the windshield glass. Just be very careful because it’s obviously sharp! I’ve linked to one below on Amazon that you could use if you don’t have one lying around the house.
No products found.
4. Baking Soda Paste
-
- Make a paste by mixing baking soda with water.
- Apply the baking soda paste to the windshield and gently rub it in using a soft cloth.
- Rinse thoroughly with water.
Note: We just came up with this one, and it seems to work pretty well for us and is pretty safe!
5. Paint thinner

Kaptainzero from Meguiarsonline suggested this tip.
This is an aggressive way to clean your windshield and I caution you before moving forward. It could damage your windshield! But if you’re at whits end and nothing else works to remove RainX from your windstream, paint thinner might do the trick.
Stay away from lacquer thinners, acetone, contact cement thinners, Xylene and other like kind, volatile organic compounds.
I like to use a product called VM&P Naptha which is made by Klean-Strip. It cost $10-$15 bucks and you can usually buy it at Lowe’s, Home Depot or sometimes Walmart.
Again, test this in an “inconspicuous spot” just in case it damages your windshield!
Be careful getting it on your paint. While it’s unlikely to strip your paint, it will quickly remove any coat of wax or other grime. It would have to sit on your paint for a long time before fading it, but it’s better to lean on the side of caution 🙂
How to use paint thinner to clean windshield:
- Throw on some gloves to protect your skin and try not to breathe it (or put on a respirator)
- Dab a little of the paint thinner on a sponge or shop towel
- Wipe your windshield with the sponge in a circular motion
- Rinse with soap and water
With any luck you should now have a clean windshield! Make sure to replace your windshield wipers because the Rain-X is likely on them still.
Conclusion
Make no mistake about it. The Rain-X Glass Treatment is proven to improve your response time in demanding weather conditions. That could mean the difference between life and death. However, the product has a tendency to smear the glass when the treatment starts to wear off. That is my only caveat about Rain-X.
Thankfully, there is an easy way to clean and polish the glass without paying an expensive professional. All it takes is a bit of water, dish soap/vinegar, glass polish, and a bit of elbow grease to get Rain-X off the windshield. Remember to rinse the windshield thoroughly after using any cleaning solution to ensure that all residues are removed. It may take a combination of these methods to completely remove Rain-X from the windshield, depending on how long it has been applied and the specific conditions it has been exposed to. Always follow the manufacturer’s instructions and guidelines for any cleaning products you use.
Now that your windshield is clean, consider protecting your interior with some Scotchgard or 303 Aerospace.