Want to know how and when to use a clay bar in your car, truck, or SUV? You will find all the answers right here. Back in the not so olden’ says of motoring, clay bars were only used by professional detailers and are not normally sold in consumer retail stores and at the auto parts shop.
Use Clay to keep your vehicle paint lookin’ good!
Hi, Mike here. You’ll find this hard to believe, but I usually get asked a lot of questions regarding the use of clay bars. How do you use a clay bar? When is the right time to treat the paint with a clay bar? Is clay bar harmful to paint? Is it abrasive like polish?
My favorite question was: “I bought a clay bar and I got a small fist-sized dough. Should I simply rub it on the paint and expect great results? I find that hard to believe.”
Thus the reason why I decided to create a comprehensive article on how and when to use a clay bar. My objective is to clear previous misconceptions about clay bars, discuss the easy steps on how to treat your paint using a clay bar, and when is the right time to treat the paint with a clay bar.
What is a Detailing Clay/Clay Bar?
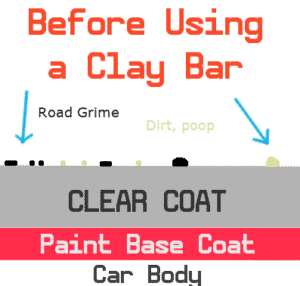
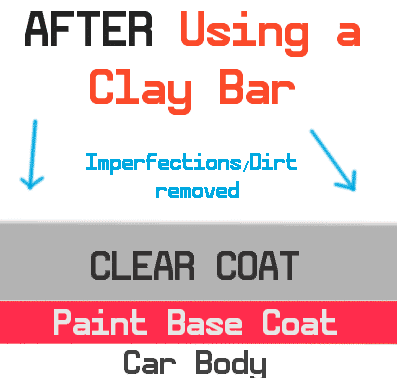
As you can see from my crude diagram 🙂 – detailing clay or clay bars are utilized to remove deep-seated contaminants in automotive paint. These are dirt, asphalt, brake dust, and industrial pollutants that cannot be removed with a simple wash even if you use a strong concentration of car shampoo.
Clay bars are not strictly intended for painted surfaces. What many people don’t know is you can use a clay bar to clean glass, metal, fiberglass, and alloy wheels.
Auto detailing clay is manufactured using a careful blend of resin compounds to remove or pull-out contaminants in painted or metal surfaces. The clay bar is designed to glide along the surface and grab harmful contaminants on the surface. This is the reason why the surface should be lubricated using clay lubricant or water to prevent dirt and debris from scratching the surface.
Is clay bar safe to use on paint?
Yes. Clay bars are many times less abrasive than using a polish to remove dirt and debris from paint. Every time you polish your vehicle, you are essentially removing a small fraction of the clear coat to level out light scratches and swirl marks.
But if you use a clay bar, you are NOT removing a fine layer of clear coat. The clay will simply absorb or pull out the foreign particles on the paint to restore a smooth surface. It will not change the chemistry of the clear coat and it will not affect the color of the paint.
When should I use a clay bar?
Since clay bar is non-abrasive, you can use it whenever you like. But you can’t simply walk over to your vehicle and rub a dirty surface with a clay bar.
You must wash the entire vehicle with clean water and car shampoo before treating the paint with a clay bar. We will talk about this more in the later part of this article.
The golden rule of thumb is to gently wipe your bare hand over the paint so you can feel the surface. If the surface is rough to the touch, you should definitely treat the surface with a clay bar before polishing or waxing. Make sure to polish or wax the paint after treating the surface with a clay bar.
We wrote some guides on waxing and polishing vehicle paint: DIY’ers guide to wax your ride and how to perfectly wax your black vehicle
The painted surface should be as smooth as glass. If the paint is rough and you want to cover the damage by applying wax, this only worsen the problem. The dirt and contaminants will seal themselves further and deeper into the paint, causing more damage and making them harder to remove.
You can use a clay bar on both old and new cars. But if you are treating a ten-year old car with a clay bar for the very first time, you can expect using a lot of clay in the process. Newer cars or fresh paint will only require a small amount of clay bar.
In fact, a single 100 gram clay bar can last up to ten uses on a moderately clean car.
How to Use a Clay Bar on Automotive Paint in 5 Easy Steps
We will divide this section into three important parts:
- Washing – You gotta wash your car to get the grime off to avoid scratches.
- Pre-cleaning – This is where you’ll get to bust out your new clay bar. It’ll help the wax and polish achieve maximum glossy shine
- Polishing/waxing – And this is the final step, we’ve got lots of guide on waxing a car, so we won’t get too in-depth in this article.
Washing
All you need are an ounce or two of car shampoo, a bucket of clean water, microfiber wash mitt, and microfiber towels. Rinse the vehicle with clean water to remove excess dirt and dust. Mix a small amount of car shampoo in a small bucket of clean water and apply the soapy water all exterior sections using a microfiber wash mitt.
Rinse the vehicle well and wipe dry using a microfiber towel. After washing and drying the car, now is the best time to inspect all painted surfaces. What I usually do is rub the paint gently using my clean hand over the hood, roof, and trunk. If the surface feels moderately rough, you will need to use a clay bar to smoothen the surface prior to polishing and waxing.
Pre-Cleaning
Next comes the pre-cleaning or preparation stage. Clay bars are part of the pre-cleaning stage in the detailing process. Clay bars are used before applying polish to further smooth and level the surface of the paint to achieve the highest gloss and depth of color.
Step 1: Lube up the bar
All you need is a clay bar and lubricant. For this, my top choices are the Meguiar’s Smooth Surface Clay Kit, Chemical Guys Clay Bar and Luber Synthetic Kit, and the Mother’s California Gold Clay Bar System.
No products found.
All of those products are pretty affordable and comes with enough clay bars and lube to treat a single car for many times over. Of course, if you are working on older or neglected paint, you can end up using all the clay bars in the kit to treat the entire vehicle!
Also, and this is more personal, but you can use water instead of the included lubricants. I found that the sprays often leave a residue and can be a pain to clean up. Simply fill a small spray bottle with clean water and you’re ready to go. This is handy if you have any issues with the lube.
Now, simply spray water or clay lube on a small section of the paint. Make sure to spray liberally especially if you are working with an extremely dirty or contaminated surface.
Step 2: Wipe vehicle panel left to right or up to down
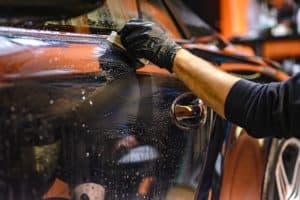
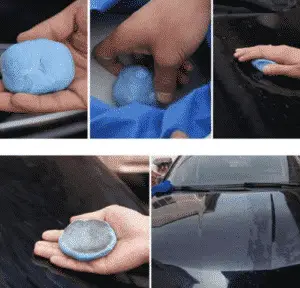
Knead the clay bar into the shape of a circular sponge. Make sure it is big enough to hold in your hand. Apply more lube for good measure before gently wiping the surface using the clay bar.
Make sure to wipe the surface using a left and right or up and down motion. Please resist the urge to wipe the clay bar using small circular motions. Since the clay will pull out contaminants from the paint, wiping the surface with circular motions might end up scratching the surface.
Step 3: dry the surface with a microfiber towel
After wiping the surface dry, you will notice the clay bar will be filled with dirt and debris. Set the clay bar aside and wipe the treated surface dry using a microfiber towel. Now, wipe your hand over the surface and revel in the smoothness of the surface.
Remember to work in small sections at a time. If you accidentally drop the clay bar on the floor, discard it immediately and get a fresh clay bar.
Step 4: Knead the clay and move to the next paint panel
Proceed to treat the entire vehicle. By this time, the clay bar will be filled with dirt. All you have to do is to knead the clay bar once more like you are kneading a cookie dough. This will reveal a fresh layer of clay. Repeat steps 1 to 3 until you’re done.
The clay bar is reusable. Simply store it in a small zip lock bag filled with moderate amounts of water or clay lube. This will keep the clay moist and ready for the next cleaning session.
Step 5: Wax and polish your paint
Finally, don’t forget to apply a light coat of polish and/or carnauba wax. I prefer to polish the paint before applying a final layer of wax. This will seal the surface of the clear coat to prevent further damage. This final step will also increase the gloss and clarity of the paint.
Best of all, the wax will act as a protective barrier that will repel dirt, bird poo, tar, asphalt, tree sap, salt, acid rain, and UV rays.
When should I replace or discard the clay bar?
You should replace or discard the clay bar if:
- The clay bar is discolored and feels rough even after kneading the clay repeatedly.
- The clay bar has an unusual or foul odor after storage.
- It was dropped on the floor. If the clay bar can remove embedded dirt and debris on the paint, it will have no problem absorbing all the dirt on the floor, which will end up scratching the paint.
- It crumbles like a baked cookie.
Conclusion
I hope this article was able to shed some light on how and when to use a clay bar. Make sure to seal the paint with a fine layer of wax after using a clay bar to produce the best results.
-mike