How to get a seat belt buckle unstuck (and more tips and tricks)
Is there something stuck in the seat belt buckle of your car? Do you find it tricky to latch the seat belt or is it hard to release the buckle? Depending on the circumstances or the amount of damage, you don’t need to spend a ton of money to fix the seatbelt in your car. By simply using a couple of neat and helpful steps, you can perform a simple DIY seat belt repair job without leaving the comforts of your own garage.
Hey I’m Vince.
Whenever the topic of broken seat belts pops up, my dad’s old Toyota always comes to mind. I also had a similar problem with my old Nissan Sentra, which was also a hand-me-down from my old man. Those old Japanese cars are thrifty and reliable, but the quality of the interior was a far cry from the modern cars of today. When my dad bought the old Toyota Crown sedan, it was admirably in perfect shape, except for the front seat belts. Those dang belts won’t retract on their own and it was hard to release the buckle.
It’s the same story with my old car. The seat belt buckle won’t latch and it was hard to pull the belt. You will need to apply a little bit of force in order to pull the belt. Now back in the days, it really wasn’t that big of a deal, but I remember when the importance of this simple tool showed it’s value to me. It was the summer of 1973, and my friend Buck drove his Plymouth Fury right into the ditch and managed to hit a fence post! He wasn’t wearing his at that time but he was lucky to walk away with only minor injuries. That old Fury though wasn’t so luck.
I took a long and hard look at both of our old cars and decided to fix it myself. As it turns out, the Toyota needed a new set of seat belt buckles while the Nissan was easier to fix. I will share with you today what I learned about DIY seat belt repair.
Let’s talk a little history about seat belts.
Seat belts are Critical to Safety (and most often the law)
In most places around the world, it is illegal to drive without buckling up.
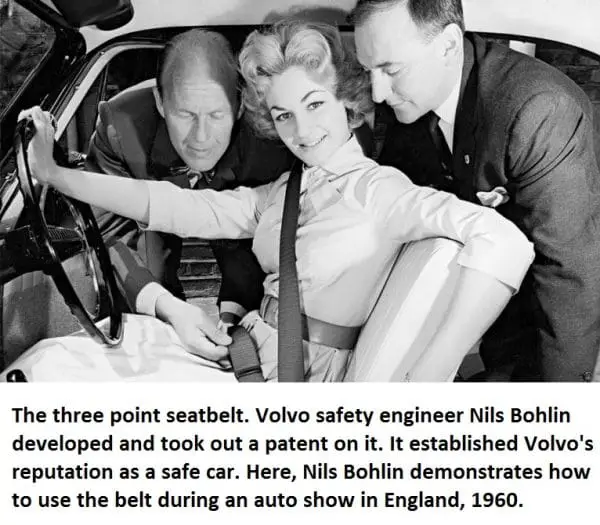
The simple three-point seatbelt was invented by Nils Bohlin in 1959. Bohlin was a former aviation engineer at Saab and was an engineer at Swedish car company Volvo when he thought about an effective belt that will absorb forces across the body. Bohlin also designed the three-point seat belt to be supremely easy to use that even a child can buckle it up without adult supervision. Volvo was kind enough to give away the patent for this important invention and has saved more than a million lives since then. The very first production car fitted with the three-point seat belt was the Volvo PV544.
Read more about the inventor of the seat belt
Now, every new car from every major manufacturer is equipped with a three-point seat belt.
The seatbelt is a simple yet ingenious system that consists of:
- Webbing – This is the part of the seat belt that is pulled around the person in the seat and is made from high-grade polyester.
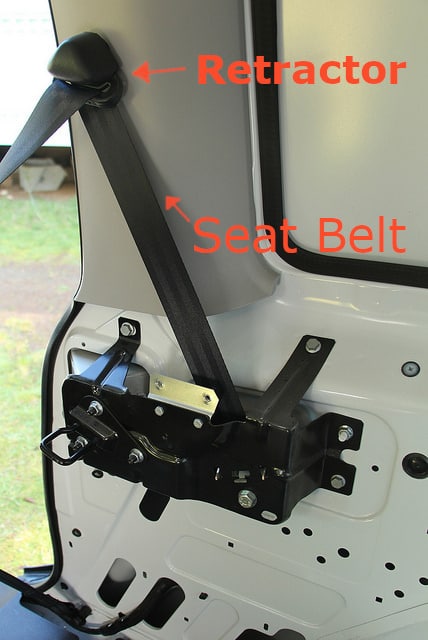
- Retractor – This is the winding mechanism that spools the webbing and allows the belt to be pulled or retracted. This mechanism is also responsible for locking the webbing in place to restrain the passenger in the event of a crash or collision. The retractor is usually fitted with a couple of sensors that locks the webbing when pulled at a faster rate than normal.
- Seat belt tongue – The tongue is attached to the webbing and is designed to fit in the buckle to secure the webbing in place. This is also called the ‘male’ portion of the seat belt system.
- Seat belt buckles – The buckles are responsible for securing or releasing the tongue. The buckle is designed to allow the seat belt tongue to be fastened and unfastened easily. In most cases, problems with the seat belt will have something to do with a stuck or damaged buckle. The buckle is also referred to the ‘female’ connector in the seat belt system.
- Seat belt pillar loops – The pillar loops is a necessary component of the three-point seatbelt system and is utilized to guide the webbing over the shoulder and across the chest of the passenger.
How to Fix Seat Belt Buckle – the quick way
If you don’t have the time, tools or patience to disassemble something that wasn’t made to be taken apart by the average user, then check out this great video showing a quick fix on a 2002 Honda CRV. Basically just spray in some WD-40, PB Blaster, Carb Cleaner, Electric Cleaner, or whatever you have available and jam a small screwdriver in and out of the buckle to break free whatever crap has gummed it up.
How to Fix Seat Belt Buckle – the long way
In order to fix the seat belt buckle in your vehicle, all you need is a basic screwdriver and a smooth butter knife (or any object that is flat and pointy).
Step 1: Inspect the Seat Belt
If the seat belt buckle won’t release easily or if the buckle won’t latch properly, it is better to check the seat belt tongue or the ‘male’ connector. In most cases, the tongue might be deformed and will need to be replaced.
If the seatbelt webbing is stuck in the retractor, a quick fix is to pull the webbing up to the maximum length and release slowly until the belt retracts. This will also work wonders if the seatbelt refuses to retract after disengaging the buckle. Simply extend the seatbelt to the full length and check to see if there is anything stuck to the belt.
Step 2: Inspect the Buckle
In most cases, there might be foreign objects lodged inside the buckle such as coins, small toys, or other foreign objects. This is the primary reason why the seatbelt is stuck in the buckle or if the buckle won’t release. The foreign object will interfere with the action of the springs and cams inside the buckle which makes it hard to release or latch the tongue.
Simply grab the butter knife or any thin and pointed object and insert it inside the buckle. In most cases, this is enough to dislodge the foreign object inside the buckle. But if there is a coin inside, you might need to remove the buckle so you can easily remove the object.
Step 3: Remove the Buckle
This is where it gets more complicated.
Depending on the make and model of your vehicle, you might need to also remove the front seats to gain easy access to the nut and bolt that holds the buckle in place. Simply grab a basic socket set and ratchet or a simple wrench to remove the buckle.
I suggest heading over to Google and searching for: “your car model and year” + how to remove seat belt buckle
Once removed, simply reinsert the butter knife inside the buckle and turn it upside down to remove the obstruction. If all else fails, you will need to open the buckle by loosening a couple of screws or by simply prying the buckle apart using a flathead screwdriver. Be careful when doing this! The springs and the cams might fly off if you carelessly pry the buckle open.
Now that everything is exposed, you can easily remove any foreign object that is disrupting the action of the spring and cam. After this, push the red button repeatedly and check for proper operation. If the springs are rusty, you can spray a small amount of WD-40 to lubricate and smoothen the action of the spring. Carefully reassemble everything, bolt the buckle back in place, and you’re ready to go.
It is easy to take apart the seat belt buckle as long as you remove it from the side of the seats. I know that removing the front seat is a bit of a hassle to be quite honest, but it will be easier to gain access to the buckle by doing so. Patience is key!
Step 4: Replace the buckle
If all else fails, or if the cam or the springs cannot be moved at all even if you push hard on the red button, it is time to replace the buckle. Now, you can also purchase a seat belt buckle repair kit if you prefer but you will need to disassemble the buckle to replace the broken springs or cams.
How to Fix Seat Belt Stuck in Retractor
Like I previously mentioned above, it is easy to fix a seat belt or webbing stuck in the retractor. In certain cases, replacing the retractor might be an easier and long-term fix. But if you follow the steps below, you can retract the webbing back in place.
Step 1: If the seat belt won’t retract after releasing the tongue from the buckle, give it a quick tug and check to see if the belt will retract.
Step 2: If the belt won’t retract, the solution will be to pull the belt to the maximum length and give it a strong tug once more. This action will be enough to activate the retractor. If it still won’t budge, give it a couple more strong tugs.
Step 3: If the belt still won’t retract, the retractor will need to be replaced.
Conclusion
It is usually pretty easy to fix the seat belt buckle in your vehicle. If you notice anything wrong with the seat belt system, it is better to fix it immediately before driving off. Remember that seat belts are designed to save your from injury or death in an unfortunate accident. But if there is something wrong with the seatbelt, the system will not work properly. If you are wary about fixing the seatbelt yourself, don’t hesitate to consult your favorite mechanic.