The Basics
Car ownership can really hit you in the wallet. In addition to the cost of purchasing your pride and joy, you have ongoing expenses such as insurance, fuel, smog tests and/or safety inspections, and maintenance. On top of this is the cost of repairs when it develops a fault. With many repair shops now charging over $100 per hour for labor, repair costs can mount up very quickly. However, thanks to the extensive computerization found in modern cars and light trucks, you can save money by performing basic troubleshooting utilizing your vehicle’s On-board Diagnostics (OBD) system and a readily available tool called an OBD2 Scanner. With the information it provides, you can either choose to repair the vehicle yourself or go to a repair shop with some knowledge of the problem.
You think these cars are expensive? Try fixing a check engine light!!!

What is OBD?
Before modern engine management systems, diagnosing a poorly running engine required some mechanical knowledge and skills such as reading spark plugs, checking ignition timing, or hunting down vacuum leaks. In the early 1980s, as carburetors and mechanical fuel injection were replaced by computer-controlled fuel and ignition systems, vehicles gained the ability to monitor engine system performance and to log faults as they occurred. What we now call On-board Diagnostics (OBD) had arrived.
In early OBD systems the hardware and software was proprietary to the vehicle manufacturer. The equipment required to retrieve OBD information on a Chevrolet would not work with a BMW. Some manufacturers simplified the process by allowing the vehicle to communicate via digital dashboards, but in most cases very expensive scanners were required. Such diagnostic equipment would typically only be found in dealership service departments – the lack of standardization made it too expensive for most independent repair shops to acquire.
In North America, this changed in 1996 when a government-mandated standard for OBD systems known as OBD-2 came into effect in order to help combat pollution caused by motor vehicles. OBDII standardized both the hardware, namely the diagnostic plug via which information could be communicated to a scanner and the form of the information that was communicated, known as Diagnostic Trouble Codes (DTC). Who the manufacturer of the car was no longer mattered. A single scanner could read the DTCs from a Ford, Honda or Mercedes. Since then other major markets such as Europe and Japan have followed suit and have adopted essentially the same standards as OBD2.
The OBD 2 standard only applies to those aspects of engine management that relate to emissions control. This is referred to as Generic OBD2. However, most manufacturers have standardized the diagnostics for other vehicle systems so that communication is through the OBD2 plug and the manufacturer specific DTCs follow the same format as Generic OBD-2
How does OBD work?
The Engine Control Unit (ECU) depends upon data from many different sensors to ensure proper operation of the engine. These sensors act as its “eye and ears”. They measure many different parameters from engine temperature, to engine vacuum, to the oxygen content in the exhaust gas. If a sensor is giving readings outside of what the ECU regards as normal operating parameters, or is giving no readings at all, the ECU will flag this up as a fault. It will store the fault in its memory in a form known as a Diagnostic Trouble Code (DTC). OBD2 requires standard form for DTCs.
Your first warning that there may be something wrong with your car comes when the Check Engine Light (CEL) illuminates on the dash while the car is in operation. The CEL is the small light in the shape of the engine. It should illuminate when the engine is started and then turn itself off.
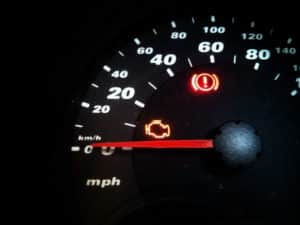
When the ECU logs a fault the Engine Light will illuminate while the car is running. The manner in which the CEL illuminates warns you of the severity of the fault. If it turns on and remains lit, then the fault is a minor one. If it flashes on and off then the fault is more serious and if it is not rectified damage to the catalytic converter may ensue.
Choosing a Scanner
First off you need to buy a scanner of which there are many types on the market today. They range from basic code readers which will only provide the DTCs and allow you to reset the CEL to much more sophisticated devices that allow real-time monitoring of engine data. Your choice of scanner will depend on whether or not you intend to perform repairs to the vehicle yourself. You should be able to buy a good quality scanner for between $15 and $10,000. On thing that we discuss frequently on ScannerAnswers is how to find the best OBD2 scanner for your car. When shopping for a scanner you need to ensure that it supports the communication protocol used by your vehicle. While OBD2 requires the diagnostic plug and DTCs to be uniform across manufactures, the communications protocols used are not. A good scanner should support all the different communications protocols. Check to see that it is compatible with your make of vehicle.
Using the Scanner
To use the scanner you first need to locate the connector inside the car. It should be located underneath the driver’s side dashboard.
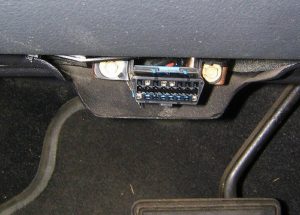
Plug the scanner into the connector. Once the scanner is connected to the under-dash plug, insert the key into the ignition and turn it to the on position (but without starting the engine). Your scanner will now ask you to enter data pertaining to your car such as the VIN number, the manufacturer and model of car, and the engine type.
After you have completed this step an option menu will appear. The number and type of menu items will depend on how sophisticated your scanner is. Select the option to check the DTCs. Selecting this option should bring up a list of one or more DTCs.
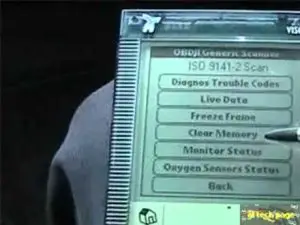
We highly recommend pulling up a full list of DTC trouble codes to reference. Here’s a LINK to a list of over 5,000 codes that you can download to your computer. If you want to look at the codes without downloading anything, here’s the link (you’ll want to use “ctrl+F” to search!): http://www.totalcardiagnostics.com
The DTCs have a standardized format starting with the letters B(Body), C(Chassis), P(Powertrain), or U(User Network) and followed by a four digits beginning with a 0(for generic OBD2) or a 1(for manufacturer specific OBD2). For the purposes of diagnosing an illuminated CEL, the code will always begin with a P and most likely will be followed by a 0. The remaining digits of the DTC describe the fault that has been logged. Some OBD2 scanners may give you a description of what each DTC means. Others do not. However, lists of codes are available online. You should make a note of the codes the description of the fault and any other information the OBD2 scanner may bring up. It is then up to you to decide whether you wish to attempt to repair the car yourself, or take it to a repair shop.
Conclusion
With the advent of OBD2 standards and the ready availability of OBD2 scanners, you now have a powerful tool to help keep your car in good running order and to save some of the cost of repairs. If you want to make sure you get the best OBD2 scanner for the money, be sure to check out our comprehensive guide right here!